How to Add Custom Google Fonts to Your Next.js Website
Create beautiful looking websites with custom fonts
Today we will see how you can add custom fonts to your Next.js Website. We will explore 2 ways to do this.
If you prefer video format you can check this out.
Create a Project
First, create a brand new Next.js Project from scratch.
yarn create next-app nextjs-font-demoThis will create a new project. Go inside it and run it
cd nextjs-font-demo
yarn dev
Head over to your browser and you will see it running locally. Change the text inside index.js with only some text.

Let’s customize the look of this text
Grab the fonts
The best place to find fonts of your choice is https://fonts.google.com/. Head over there and you will find all kinds of fonts there.
Pick any one of them and get the link to download it. We are going with Nunito for this tutorial. You will find the link on the right panel
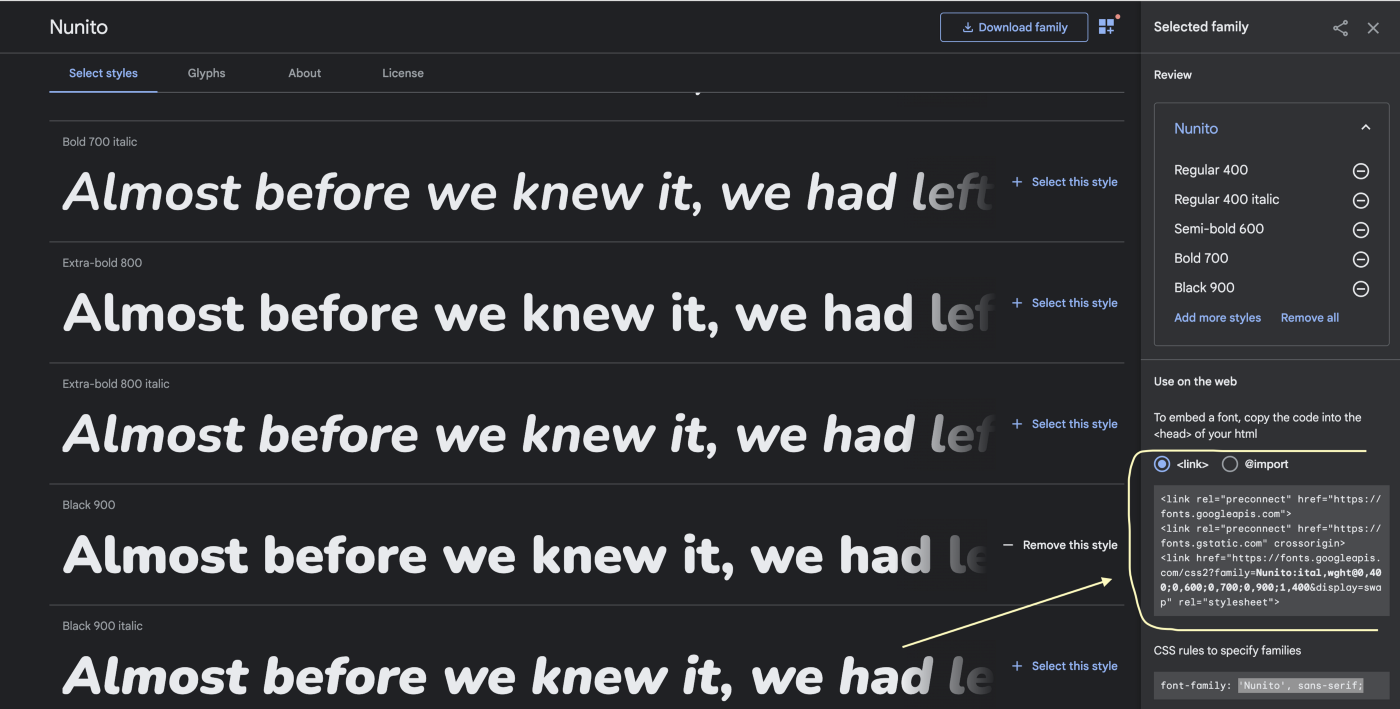
You can add or remove various weights for this particular font. Get the link from the right panel.
First Way
The first way to do this is by a custom _document.js file. The Document is a special feature of Next.js that augments your applications and tags.
Create a new page under /pages directory named _document.js file and add the following code there.
import Document, { Html, Head, Main, NextScript } from "next/document";

class MyDocument extends Document {
  static async getInitialProps(ctx) {
    const initialProps = await Document.getInitialProps(ctx);
    return { ...initialProps };
  }

  render() {
    return (
      <Html>
        <Head>
          <link rel="preconnect" href="https://fonts.googleapis.com" />
          <link rel="preconnect" href="https://fonts.gstatic.com" crossOrigin="true" />
          <link
            href="https://fonts.googleapis.com/css2?family=Nunito:ital,wght@0,400;0,600;0,700;0,900;1,400&display=swap"
            rel="stylesheet"
          />
        </Head>
        <body>
          <Main />
          <NextScript />
        </body>
      </Html>
    );
  }
}

export default MyDocument;
There are some customizations that you need to do for the link tags here. For example notice we have closed the link tags with /> instead of >
Also, the crossorigin is renamed to crossOrigin="true" because we are writing jsx and not plain HTML here.
Well, now this will download the desired font for us. Now we just use it anywhere we want like the following.
font-family: ‘Nunito’, sans-serif;Second Approach
We can also import Fonts into Next.js using the global CSS.
You will find a file named global.css under the styles folder. The styles applied here will be applied to the whole website.
Now go there and add the following line
@import url('[https://fonts.googleapis.com/css2?family=Lobster&display=swap](https://fonts.googleapis.com/css2?family=Nunito:ital,wght@0,400;0,600;0,700;0,900;1,400&display=swap)');Also, don’t forget to replace the actual URL with your desired one.
This will do the same thing as before.
Final Result
Now after adding the font and applying it to the body of the global.css file our final result will look something like this

So our font is successfully applied to the project.
I hope you learned something today. See you next time!
Repository: https://github.com/Mohammad-Faisal/nextjs-fonts-demo